Share This Article
Setting up Google Analytics for your website or online business is easy. It only takes 6 steps to do it and here we will go over them.
Google Analytics is the web analytics tool from the American technology giant which allows us to measure, track and analyse the behaviour of those who use our website. Although it is totally free, it is undoubtedly the most advanced on the market and a great majority of companies use it for their web analytics. From the data which can be extracted, you can see how users interact with your website or your drop shipping store and it offers all kinds of information.
This is not the first time we have spoken about Google Analytics on this blog. We recommend that, before you start to set up this tool, you read our article which explains it in more depth What is Google Analytics?.
It is quite simple to set up this tool for your business. In this article, we will explain the 6 steps it takes to set up Google Analytics.
Step1: Create a Google Analytics Account
As we mentioned earlier, it is completely free to create and set up your Google Analytics account. All you need is an email address which will be linked to the account you create.
There are two types of email account which you can use for this first step:
- A Gmail account: this is the easiest way to create an Analytics account. If you already have a Gmail email address for your online store, then all you need to do is go to the Google Analytics web page using your email address and password and then sign up.
- An account in a different domain: if you want to link your Google Analytics account to an email address on the domain of your online store (example@domainexample.com) then remember that the email account must have been previously linked to Gmail. That is to say, if your email address was not created with G Suite, the system will not allow you to access Analytics.
Once you have the correct email account, you can access Analytics by clicking on the “Sign Up” button.
Step 2: Initial set up: Google Analytics
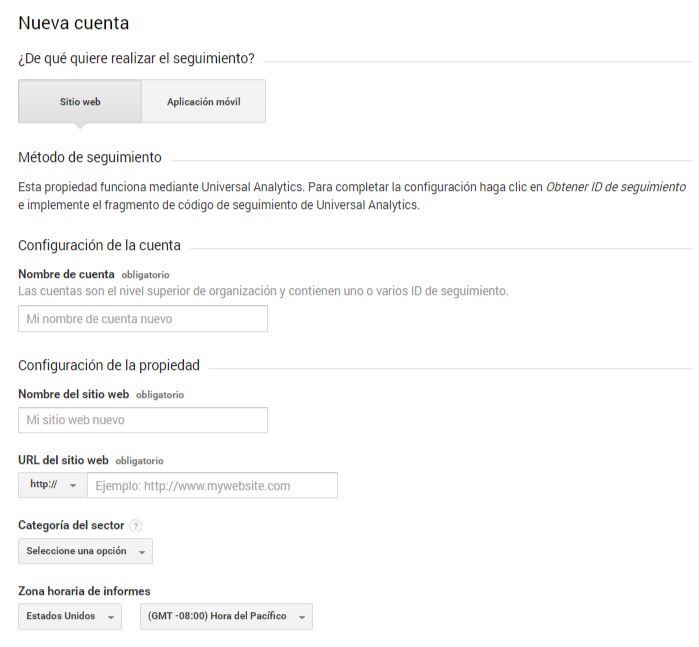
During this process, the following questions will be asked and you will require the information to answer them:
- What is to be monitored online: Do you want to know the data for a website or a mobile application? The configuration will be different from one to the other. In case you want to set up Google Analytics for a website or e-commerce, then you will have to fill in the following information.
- Account name: this is the top level when it comes to the organisation of your Analytics accounts. If you only need one Google Analytics account because you only have one website, you can use the website name itself and you won’t have any problems. If you are managing several accounts, then the name should be generic to group them all together.
- Website name: this will be the second level of organisation for your Google Analytics account. This can be the name of your website or that will help you with organisation.
- Website URL: first, check if your website starts with http:// or https://, you will have to select one of the options from the first drop down menu. Once you have done this then simply enter your web address.
- Category: you must choose the industry or professional sector which is the most appropriate for your website from the drop-down menu.
- Reporting time zone: Select the most appropriate option to collect data from Google in real time, it should be the same time zone that the website is managed from.
Once you have correctly filled in this data, proceed to click on the button to create your Google Analytics tacking ID.
Step 3: Get the tracking code
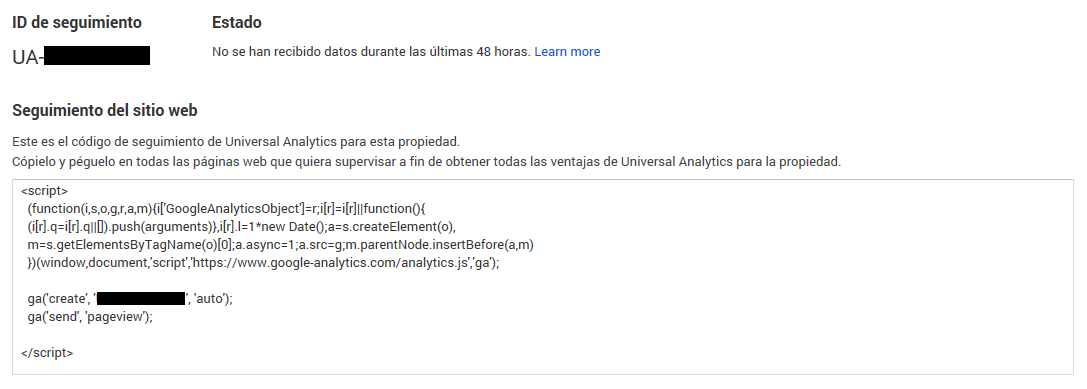
When you press the button, and accept Google’s terms and conditions, you will get to a page which looks like this:
Once Google gives you this code, select it and copy it.
Step 4: Implement the Google Analytics tracking code
This is the most delicate part of the process when setting up Google Analytics, especially if you do not have a basic understanding of HTML code.
The Google Analytics tracking code must be implemented or pasted just before the closing tag in the website’s HTML code. If you use a CMS like WordPress you shouldn’t have any problems implementing it. There are templates or plugins which will allow you to enter it directly without having to dive in and change anything in the coding.
If you have a BigBuy drop shipping store and you want to implement your Analytics code then skip to the next step:
Step 5: Implement Google Analytics for Prestashop online stores
As you already know, drop shipping stores for BigBuy have been developed with some of the best technology available for e-commerce management: Prestashop.
The Analytics code can be added to Prestashop in two ways:
- By hand: this involves adding the code in the header file within your Prestashop template before the closing tag.
- Through the Analytics module: if you prefer to do this through the ad-hoc Google Analytics module for Prestashop then this is also possible. All you need to do is to download the module and follow the instructions.
Step 6: Start measuring and interpreting data with Google Analytics
Ready! Now Analytics is configured and you can start to obtain some very interesting data which will help you to understand your user’s behaviour. We will talk about which data is the most important in other posts as well as which metrics are the most important for an online store


 Contact


