When installing a new payment method in your Prestashop store, you should carry out a series of checks and adjustments to the payment preferences to ensure that the new payment method works correctly and that your orders are synchronised in the right manner.
The first thing you should do is go to the Payment > Preferences section and check the 4 options that appear:
- In currency restrictions, check that the option for Shop default currency is selected in the column for the new payment method. If it is not selected, do this now.
- In group restrictions, check that the column for the new payment method is activated to include the user groups you want. If this is not done, activate those groups by default.
- In country restrictions, you can restrict the countries in which to accept the payment method.
- In carrier restrictions, you can select which shippers you want the method of payment to be available to.
Once the four sections have been checked, you should do the same with the statuses. There are payment methods that add new statuses and others that use the default statuses within Prestashop. For this reason, you should check if new statuses exist, in which case, you will need to carry out a small configuration.
Go to Shop Parameters > Order Setting and, once inside this, click on the Statuses tab.
In the example provided in the image you can see how Klarna, the payment method which we have used in the example, creates 4 new statuses: “Klarna pending invoice”, “Klarna pending partpayment”, “Klarna accepted invoice” and “Klarna accepted partpayment”. Ensure that the new statuses have the option “send mail to customer” activated, so that the customer will be informed of the status of their order.
If the payment method does not generate a status within this section, you don’t need to take any action. If this is the case, you need to identify the status in which the order should be sent, as this may be one or more statuses according to the payment with which the order has been made. If this is not clear to you, make a trial order, select the new payment method, and then check the order in the back office to establish the its status.
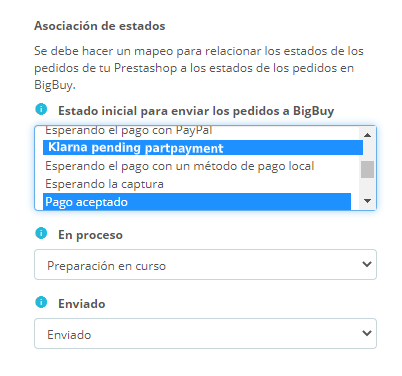
Once you know the status, or statuses, you should configure them in the mmoconnector module of your store so that the orders from these new statuses are automatically sent to the MIP and are processed correctly. To do this, go to the mmoconnector configuration module and in the status/statuses within the section, select “Initial status for carrying out BigBuy orders” and then click on Save, as shown in the following image.
If you have any questions, you can read about how to configure the mmoconnector module in the following post.


 Contact


